Showing posts with label tutorial. Show all posts

Thursday, March 20, 2014

DIY Pressing Board

Hey guys!!! Today I'm going to show you how to make your own pressing board!! This is a super easy DIY project that will really make a difference in your sewing and quilting! Don't forget to check out my video where I will walk you through exactly how I made it! 


The difference between a PRESSING board and an IRONING board is HUGE! The reason you want to use a PRESSING board when quilting is you need a hard surface. An ironing board has to much give from all the cushion the put on it and pressing your fabrics on it can result in warped fabrics, which we NEVER want! The hard surface of a PRESSING board will help you PRESS your seams without having to worry about fabric distortion!

Let's get started with the tutorial:

Materials you will need are:
Piece of Plywood from your local hardware store, in any size that will fit your needs... (mine is 3/4" thick x 25" x 25")
100% cotton batting (you don't want to use polyester batting for this)
Fabric (home decor weight, duck, or canvas is ideal (I'm using duck cloth)
and an electric stapler


Step 1:
Cut your cotton batting and fabric at least 3 inches larger than the plywood on all sides.
Then layer them as follows: fabric (wrong side facing UP), batting, then center your piece of plywood as best as you can.


Step 2:
Start on any side, pull your batting and fabric taught around the plywood and place 2-3 staples along the length of that side. Repeat for each side, leave the corners alone for now.


It should look something like this...

For the board to lay flat we will need to trim away excess fabric from the corners. I should've done this before I started stapling the sides down but I didn't think about it until I got to the corners. So, if you want to cut out a squarish piece from each corner before you start you can. But this is how I did it....
I took one side of the fabric and folded it down, like the picture above shows

I started cutting right where the 2 fabrics met, make a straight cut until you reach the edge of the board.


Now, pull that section straight up...

Now cut straight across. You will end up having a rectangular shape cut off.


Fold your shortest side down, then overlap the other side and staple into place. You want to make sure you staple through all 4 layers of fabric, I put an additional staple closer to the corner because I didn't want it to come loose.

Repeat for each additional corner.


Now, flip it over and VOILA you are done! You have made yourself the perfect place to press!!!!

I hope you guys enjoyed this tutorial, if you have any questions make sure to leave them in the comments and I will get back to you!

Don't forget to check out the video for this tutorial (just click right on the image above!) and SUBSCRIBE to my YouTube channel!


~Hope y'all are having a GREAT day!!!~

Thursday, October 10, 2013

Happy Bunting Mug Rug- a Tutorial

I hope you guys are ready for this! I've got a really fun and simple Mug Rug tutorial for you!!! It comes together really quick and is a GREAT way to use up your little bitty scraps! (Because if you are like me, you can't throw those away...they may come in handy one day!) Well, this is the day! I hope my instructions are clear but if you have any questions please leave them in the comment section as other people may have the same questions! I will warn you, this is a very photo heavy post, but it's only because I wanted you guys to be able to see exactly what I am talking about! I will be posting a "Part 2" for the binding, I figured this post was going to be long enough!
Alright, y'all ready to get started????
                                                    Happy Bunting Mug Rug

I hope you all enjoy!
Materials Needed:
- Pile Of Scraps in whatever colors you choose!
- 8.5" x 10.5" base fabric (I used Essex Linen for mine)
- A piece of cardboard or template plastic (I used the back of a cereal box)
- Washable glue stick
- Triangle shape to trace (I used the 2 rulers pictured above, the Sidekick Ruler and EZ Triangle Ruler) but you could easily draw out a triangle using a regular ruler
- Rotary Cutter and Mat (I used my smallest rotary cutter but you don't have to)
- Fabric safe pen or marking tool
- Non fabric scissors
- Scrap of batting at least 9.5" x 11.5" (not pictured)
- Backing fabric (around the same size as the batting. Also not pictured)
- A strip of fabric measuring 2" x width of fabric for binding (not pictured)
(I use my walking foot for every step in making this mug rug, but it is not necessary!)
First thing you need to do is PRESS every piece of scrap you are going to use. It will make it MUCH easier to work with! Once you get them all pressed set them aside.

Let's make our triangle template!
Trace a 1" triangle onto your cardboard.

I then used the pointy side of my Sidekick Ruler to make a complete triangle. (You can just free hand one if you choose.)


Using your NON fabric scissors cut out your triangle shape. As you can see, the triangle does not have to be PERFECT!

Line up your triangle with a clean edge of your scrap and use your rotary cutter to cut around it. Take your time with this part, you don't want to cut your fingers!


You can flip your triangle over and cut again from the same scrap if you have a bigger scrap.
Continue this until you have at least 20 or so triangles!


I always cut more than I need so I have a lot of fabrics to choose from. I also make at least 4 of these at one time.


Now, with your base fabric and fabric safe marker/pen draw out how you want your bunting to hang. You can make this as simple as you want or as complex as you want! I always draw at least a slight curve to mine.


Here is another example of how you can draw your lines.


Start laying your triangles out. You want the edges of each one to slightly overlap the previous triangle, also make sure you line them up with your drawn line.


Play around with your layout until you have it looking just the way you want it!

Once you have decided on your layout get your washable glue stick and glue the triangles into place, one at a time. You don't need a lot of glue, just enough for the fabrics to stick to each other.


Center your base fabric onto your batting piece. I don't usually pin here but you could use a few pins to prevent shifting if you want.


Now take that to the machine and we are going to top-stitch. Start at one end of your bunting, using a 1/8" seam allowance (or smaller) stitch all the way across to the other edge of your bunting.


At the end of your bunting keep your needle in the down position and pivot to stitch down the rest of the triangle. I do not break thread at all during this step. I stitch until I reach the bottom corner, pivot again, stitch back up to the top, pivot, take a stitch to reach the next triangle and repeat until I'm back where I started stitching. I do back-stitch on the very last triangle before I cut thread. (I hope that makes sense)


You will repeat the above step for each bunting. Once you have it should look something like the above picture. (I guess you could say we are raw edge appliqueing?)


Now you are going to go the edge of your base fabric, where you drew your lines and stitch from edge to edge following your bunting as close as you can. I stitch this line multiple times.

(I hope you can see my stitching lines from this picture so you have the idea of what I'm talking about)

Once you have completed the last step, trim all excess batting.


Get your backing fabric out, make sure it's really good and pressed flat. (This is when I attach my label to the backing fabric.) You will center your finished top onto this backing (wrong sides together) and baste (using your preferred method) into place. (I use 505 but it's just as easy to add a few pins in there)

Once you have that basted together, take it to your machine and stitch around all 4 sides using a seam allowance slightly smaller than 1/4".

Once you have that completed, all you need to do is trim the excess and bind it! I use a 2" wide piece of fabric for my binding, and I do it all by machine. I'm hoping to get the tutorial for how I bind my mug rugs up tomorrow or Sat.
(I stitch the binding onto the back and then fold it over to the front and machine stitch it into place.)


Here is my completed mug rug! I love how these look! They are so quick to make and perfect little gifts for anyone (teachers especially!!!)

I hope you enjoyed this tutorial and that its easy to follow. If you have any questions please don't hesitate to ask!

Linking up with Amanda Jean's finish it up friday!


~Hope y'all are having a GREAT day!!~

Wednesday, June 12, 2013

A Modern Dresden Plate: my first tutorial!!!!


I've worked really hard on this and I believe it is FINALLY ready! Here is MY VERY FIRST tutorial EVER! Hopefully it won't be my last one! I will warn you this post is VERY photo heavy, I'm a visual learner so I tried to take pics of every step.
Disclaimer: I know there are tons of tutorials on Dresden Plates and I'm not trying to "reinvent the wheel" this is more of a "this is how I did it" type tutorial!
If you have any questions feel free to leave a comment and I will try my best to answer your questions there!!!!
Alright, let's do this!!

A Modern Dresden Plate Tutoiral

Supplies Needed:
- Basic Sewing Supplies
- Fabric Scraps
- EZ Dresden Ruler
- Rotary Cutter & Mat & Ruler
- Olfa Circle Cutter (optional)

Use a 1/4" seam allowance unless state otherwise
"RST"- Right Sides Together


Make sure your press all the wrinkles out of your scraps!


Cut your scraps into varying widths (from around 0.75" to 2/5")


Subcut them into around 5" lengths


Once you have them all subcut start making strip sets by sewing 2 strips RST (chain piecing makes this step go really fast!)


Press your seams open to help reduce bulk


Sew each strip set into a 4 strip unit, until all strips are made into units. You can do this by randomly selecting your fabrics or in a certain order! (I think this would look amazing in a rainbow of colors!!!)
Again, Press seams open to help reduce the bulk

Now it's time to start cutting our Dresden Blades!!!!


Using your Dresden Ruler (I use Darlene Zimmerman's EZ Dresden Ruler that can be purchased at any local quilt shop/fabric store very inexpensively!) line up the 5 1/2" mark with the straight edge of your Strip Unit. (arrow is pointing to where you need to line up at)

In order to waste as little fabric as possible, line up your ruler as close to either side of your unit as you can! Cut around your ruler.


Once you have cut one blade out of your unit, flip your unit around so the bottom is now the top. Realign your ruler with the now top edge and make your 2nd cut. This not only helps save your fabric but it gives you more of a variety in your blades. (I didn't want mine to look uniform)


Here is another example of above step.

I used 21 blades for my Dresden Plate. Once you have cut all 21 blades out...


Lay them out in whatever order you choose. I chose to throw a few solid blades into mine.


Now, pick a place to start. Take 2 of your blades and place them RST, paying more attention to lining them up at the top edges (the larger part of the blade) rather than the bottom edges.


Sew your blades together using your 1/4" seam allowance. Go around your Dresden adding one at a time, I don't like chain piecing on this part because I tend to lose my placement when I do that. You can chain piece if you so choose, I just don't like to on this part! Make sure you go either clockwise or counter clockwise.


Continue in that manner until you have added every blade


At this point yours should look something like this.


Now fold that in half, aligning your last 2 blades to complete your circle. Sew them together with the same 1/4" seam allowance we have been using.


Yours should now look like this


Take it to your pressing board and press flat. At this point I find it much easier to press your seams to the side. Press from the front and back to make sure your seam allowances are lying as flat as possible.
You have now completed the first part of your Dresden Plate!!!! YAY!!!

Now let's get it prepared to add to our base fabric (which I'll tell u more about in just a sec.)

Remember...this is how I DO IT, if you find another way of appliqueing easier than this, feel free to use your favorite method.


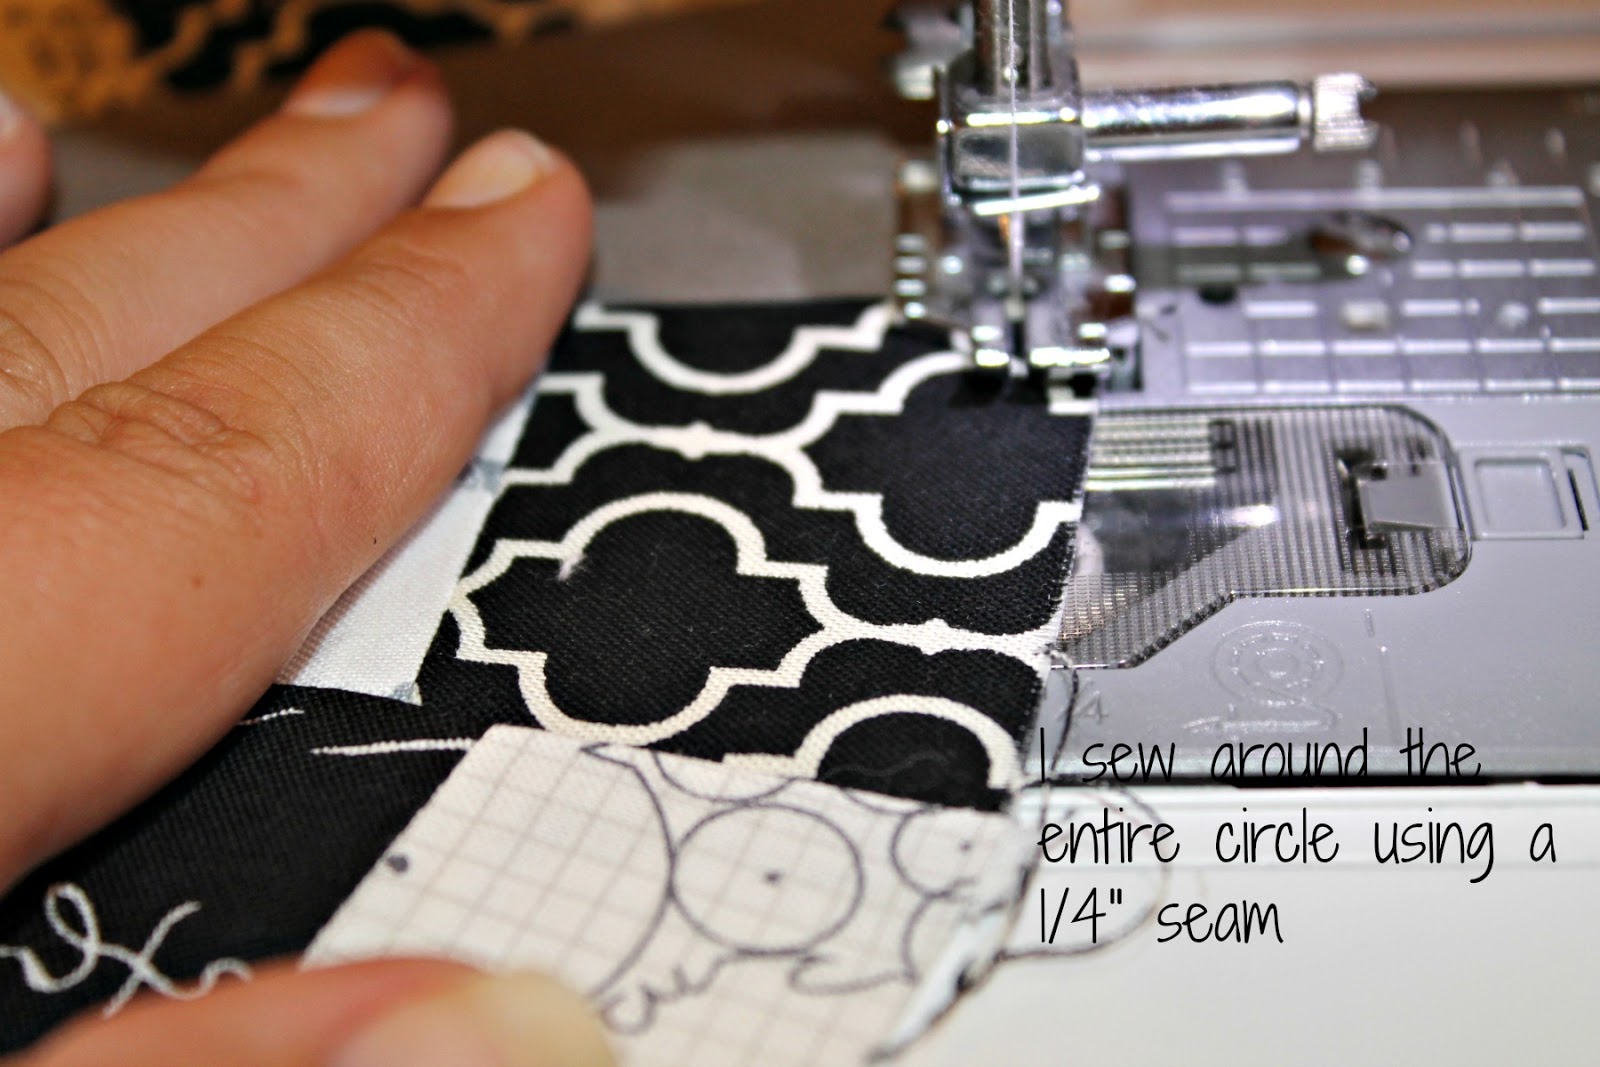
I sew around the entire circle (Dresden Plate) using a 1/4" seam. This makes it easier for me to turn the raw edges under.


Once you've sewn all the way around your Dresden take it to your pressing board. I first finger press toward the wrong side up to my stitching line for a few inches, then take my iron and press with it, then repeat that process all the way around.
Flip it over to your right side is facing up and give it a really good press making sure to keep your edges turned in toward the wrong side!


You should have something similar to this.

Now you need to prepare your block base. This Dresden Plate will fit onto a 16" square base. I chose to center my Dresden on my base, but I think it would look pretty cute off centered too!


I'm not big on pinning, but once you position your Dresden on your base you need to pin it down. I think I pinned every 3 to 4 blades all the way around. You don't want your Dresden to slip out of place while you are stitching it down!!!!


With a coordinating thread (you can choose to match the thread to your Dresden or your base, either way will work!) stitch your Dresden down. I chose to use a zig zag stitch, but if you prefer you can use a straight stitch or decorative stitch, or you can choose to hand stitch yours down.


This is how mine looked at this point.


Choose your fabric for the middle of your Dresden. I chose to piece mine to match my base but a pop of color on this part would've been cute too. I use my Olfa Circle Cutter for this part but you can use a cup or any other circular object to cut out your circle. It needs to cover the middle of your Dresden plate by a good 1/2" to 3/4".


Repeat the process of stitching 1/4" around the entire circle and pressing your raw edges towards the wrong side up to your stitching line.


Center your circle over the center of your Dresden Plate and stitch it down using your stitch of choice.

And voila! You have a complete Dresden!!! I forgot to take a picture of the block before I finished it. I made mine into a mini quilt. I'll show you some pics of my finished mini! I LOVE the way it turned out!


I chose to use the rest of my scraps to make a crazy pieced backing. I did a bit of echo stitching in the center circle and chose to stipple the rest.


I LOVE IT!!! :)

I hope you find this tutorial helpful! If you have any questions don't hesitate to leave me a comment or shoot me an email! I'd love to hear what you think!

~Hope y'all are having a GREAT day!!!~