

I've worked really hard on this and I believe it is FINALLY ready! Here is MY VERY FIRST tutorial EVER! Hopefully it won't be my last one! I will warn you this post is VERY photo heavy, I'm a visual learner so I tried to take pics of every step.
Disclaimer: I know there are tons of tutorials on Dresden Plates and I'm not trying to "reinvent the wheel" this is more of a "this is how I did it" type tutorial!
If you have any questions feel free to leave a comment and I will try my best to answer your questions there!!!!
Alright, let's do this!!
A Modern Dresden Plate Tutoiral
Supplies Needed:
- Basic Sewing Supplies
- Fabric Scraps
- EZ Dresden Ruler
- Rotary Cutter & Mat & Ruler
- Olfa Circle Cutter (optional)
Use a 1/4" seam allowance unless state otherwise
"RST"- Right Sides Together

Make sure your press all the wrinkles out of your scraps!

Cut your scraps into varying widths (from around 0.75" to 2/5")

Subcut them into around 5" lengths

Once you have them all subcut start making strip sets by sewing 2 strips RST (chain piecing makes this step go really fast!)

Press your seams open to help reduce bulk

Sew each strip set into a 4 strip unit, until all strips are made into units. You can do this by randomly selecting your fabrics or in a certain order! (I think this would look amazing in a rainbow of colors!!!)
Again, Press seams open to help reduce the bulk
Now it's time to start cutting our Dresden Blades!!!!

Using your Dresden Ruler (I use Darlene Zimmerman's EZ Dresden Ruler that can be purchased at any local quilt shop/fabric store very inexpensively!) line up the 5 1/2" mark with the straight edge of your Strip Unit. (arrow is pointing to where you need to line up at)

In order to waste as little fabric as possible, line up your ruler as close to either side of your unit as you can! Cut around your ruler.

Once you have cut one blade out of your unit, flip your unit around so the bottom is now the top. Realign your ruler with the now top edge and make your 2nd cut. This not only helps save your fabric but it gives you more of a variety in your blades. (I didn't want mine to look uniform)

Here is another example of above step.
I used 21 blades for my Dresden Plate. Once you have cut all 21 blades out...

Lay them out in whatever order you choose. I chose to throw a few solid blades into mine.

Now, pick a place to start. Take 2 of your blades and place them RST, paying more attention to lining them up at the top edges (the larger part of the blade) rather than the bottom edges.

Sew your blades together using your 1/4" seam allowance. Go around your Dresden adding one at a time, I don't like chain piecing on this part because I tend to lose my placement when I do that. You can chain piece if you so choose, I just don't like to on this part! Make sure you go either clockwise or counter clockwise.

Continue in that manner until you have added every blade

At this point yours should look something like this.

Now fold that in half, aligning your last 2 blades to complete your circle. Sew them together with the same 1/4" seam allowance we have been using.

Yours should now look like this

Take it to your pressing board and press flat. At this point I find it much easier to press your seams to the side. Press from the front and back to make sure your seam allowances are lying as flat as possible.
You have now completed the first part of your Dresden Plate!!!! YAY!!!
Now let's get it prepared to add to our base fabric (which I'll tell u more about in just a sec.)
Remember...this is how I DO IT, if you find another way of appliqueing easier than this, feel free to use your favorite method.
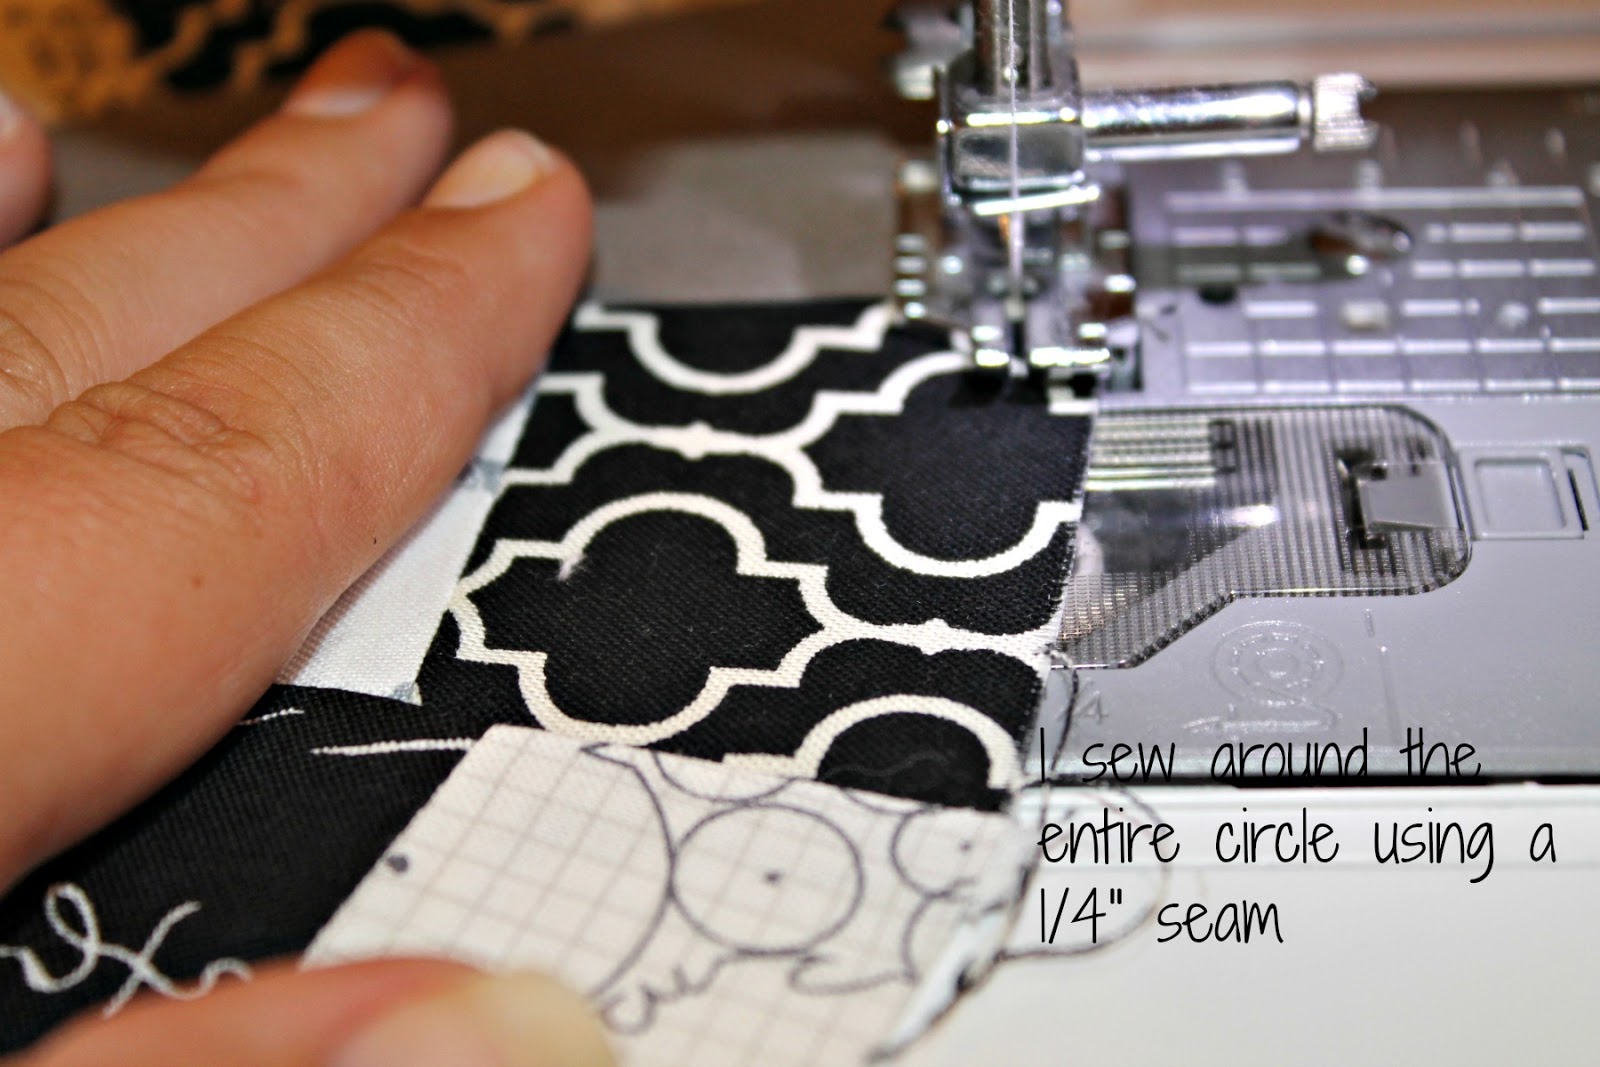
I sew around the entire circle (Dresden Plate) using a 1/4" seam. This makes it easier for me to turn the raw edges under.

Once you've sewn all the way around your Dresden take it to your pressing board. I first finger press toward the wrong side up to my stitching line for a few inches, then take my iron and press with it, then repeat that process all the way around.
Flip it over to your right side is facing up and give it a really good press making sure to keep your edges turned in toward the wrong side!

You should have something similar to this.
Now you need to prepare your block base. This Dresden Plate will fit onto a 16" square base. I chose to center my Dresden on my base, but I think it would look pretty cute off centered too!


With a coordinating thread (you can choose to match the thread to your Dresden or your base, either way will work!) stitch your Dresden down. I chose to use a zig zag stitch, but if you prefer you can use a straight stitch or decorative stitch, or you can choose to hand stitch yours down.

This is how mine looked at this point.

Choose your fabric for the middle of your Dresden. I chose to piece mine to match my base but a pop of color on this part would've been cute too. I use my Olfa Circle Cutter for this part but you can use a cup or any other circular object to cut out your circle. It needs to cover the middle of your Dresden plate by a good 1/2" to 3/4".

Repeat the process of stitching 1/4" around the entire circle and pressing your raw edges towards the wrong side up to your stitching line.

Center your circle over the center of your Dresden Plate and stitch it down using your stitch of choice.
And voila! You have a complete Dresden!!! I forgot to take a picture of the block before I finished it. I made mine into a mini quilt. I'll show you some pics of my finished mini! I LOVE the way it turned out!

I chose to use the rest of my scraps to make a crazy pieced backing. I did a bit of echo stitching in the center circle and chose to stipple the rest.

I LOVE IT!!! :)
I hope you find this tutorial helpful! If you have any questions don't hesitate to leave me a comment or shoot me an email! I'd love to hear what you think!
~Hope y'all are having a GREAT day!!!~

6 comments:
Thank you! I know how difficult it is for me to do this! I applaud you!
Awesome tutorial, Kelie! It's very detailed and clear. I like how you added the solid blades. Are you entering this in the mini quilt contest?
GREAT Job on the tutorial! Like you, I do much better with visual learning than to just read. Because of that, your tutorial is wonderful even though I am sure it took you much more time. Please know those of us who are visual appreciate the time you took so keep it up. Thank you.
Awesome job on the tutorial! I just made a Dresden plate but love your version of it. You did a great job explaining it!
I'm visiting from the Ellison Lane Quilt Block Roundup. Thanks for a great tutorial! I'm going to be using it to make a block for my sewing bee next month!
Awesome tutorial! I can't believe it's your first one. Very professional! Thank you...
Post a Comment